10.31.2012

slipcovered industrial bar stools


When we moved into the house 5 years ago after the renovations were complete, I had this setup in the kitchen under the window:
 It was cute, but there was not really space fore dining chairs---but it was a case of using what I had at the time, and I really liked having the softness and pattern of the upholstery balancing the wood cabinets on the other side.

As time went on, I switched out the curtains (don't worry the green ones made out of the fantastic vintage sheet just moved to another room) for these also made out of vintage fabric.  One reason I switched them is because I had enough of the vintage floral to make curtains for my glass doored cabinets:

Note:  in real life, the backsplash is much brighter and the cabinet doors don't read as striped.
Other changes, including selling the original table, the need for more storage in the kitchen, and the need to find a home for my partner's beloved baker's rack--(don't ask me, I don't understand why he likes it either), I moved the baker's rack in front of the window.

 
I didn't hate this setup.  I liked the extra storage, and it did provide privacy.  It was awkward with the chairs, and we eventually replaced them with these great industrial style stools from world market.  Side note--I know industrial is trendy right now, but I've honestly been loving touches of industrial design, including stools, for years.  I dragged home my first rusting metal cart in the mid 1990s:  I really liked the stools, including the wood, but I felt this whole area had gotten a little dull, literally.  I mised my pattern and color from the upholstery.  I also got fed up trying to open and close the window (why yes, I occasionally burn dinner filling the kitchen with smoke....why do you ask?) with the rack in the way.  Plus, I felt it really closed in an already small space.

Then I remembered this kitchen.  I don't remember where it came from, though.  I know it was in a magazine.  I think Cottage Living, but I'm not sure.  What I am sure about is that I loved those slipcovered stools from the moment I saw them.  I remembered this image, looked at my stools and realized I could have that look.


The fabric is from a beloved and ink stained shirt.  I loved the color and stripes so much I saved it for a potential project.  I loved the way the stripe looks with the floral and how it pulls in aqua from the adjoining office and back splash. They are loose and just slip on the stools like a hat.  It was only after making the slips, though, that I realized they looked like prison hats from a 1930s movie.  I'm okay with that though.


Truth in blogging:  The stools are used rarely.  At most once a week.  Therefore, I didn't secure the slips.  They slide around a little if they've been sat on, but it's easy enough to straighten them.  If I used them daily, though, the looseness would be an issue.  I'd have to find a way to attach them, either with velcro, ties, or something else.  As of now, it hasn't presented enough of an issue for my to take the time and effort.


In conjunction with some other small changes, I switched the baker's rack with a metal cart I found in my father's pasture with peeling paint in a combo of royal blue and John Deere green.  I love the way it turned out.  I still have storage for things like my dutch ovens and mixer, but it keeps the room so much more open.  And I love the splash of color with the vintage daperies.  


Update on laundry and to do list:  I've done a couple of small items on the list, so that's going well.  The laundry room is kind of on hold...but for a good reason.  I have reason to believe a fairy godmother is going to gift us with a new washer/dryer set for our commitment ceremony;  in that case, if i have fresh, white appliances and don't have to work around a mis-matched washer, I will definitely make some different paint decisions.  I will keep y'all posted.

10.29.2012

a modern fireplace finish (and a list update)

On Saturday, I showed you a sneak peak of a modern decorative paint finish in metallics that I had been working on for a friend's fireplace.  I have an after to share.  After her living room is finished....the furniture should start arriving this week, I'll show you an after after.

I drew off large rectangles (based on the fire box size) with a level, taped then, and created the finish with four different shades of paint blended with a little glaze.  I was going for a very organic feel, vaguely referencing horn.


And Sunday, I took advantage of a beautiful day, with plenty of peace and quiet, to start tackling my list.  I had so much regular housework to do (the consequence of a busy schedule), that I couldn't do a lot, but I felt good about getting started.

Living Room:
--Rework existing cafe curtains
--Move side tables and butler's tray
--Switch out pillow covers on sofa (already have the covers)
--make new pillow covers for side chairs
--recover piano bench (just draped it with a throw and it looked surprisingly good)
--find or make new sofa throw
--move rug upstairs to den
Dining Room:
--make tailored white cloth for table
--redo existing sheer draperies and move in decorative panels from office(actually only partially done--the panels are moved in, but I going to have to put them on a different rod--i have one I can use, but it is another step i wasn't anticipating.   The good news is that the draperies look good.)
--frame large photo
--cover or replace lamp shades
--rework mantle display
--polish silver

10.27.2012

busy


Do you like being busy?  While my absolute favorite way to spend a day is puttering around my own home, moving a pillow here, a chair there, maybe a little light housework (I KNOW, right......who would ever believe that I would come to enjoy cleaning...even a little)...maybe a little reading and a little cooking...possibly having guests over...I do adore a full day when it's full of fun busy. 

A side note:   It's what I always imagined life was like as an adult:   fun with friends, glamorous work, excitement.  I was one of those children who couldn't wait to grow up, preferred hanging out with the adults, and wanted to play pretend games like secretary (I know, I know...my parents were concerned, but took it in stride), private detectives (for the record, I was one of Charlie's angels), etc.  In fact, I loved nothing more than playing with candy cigarettes while drinking my Mountain Dew out of a sherbert glass and pretending it was champagne (I'm sure you can imagine how much by Baptist, teetotaler, non-smoking mother enjoyed my doing that).  Anyway, I was convinced that being a grown-up was nothing but glamour, glamour, glamour.........imagine my surpise when I realized every evening of champagne is balanced by at least of day of yard work, cleaning the litter box, and figuring out how to stretch the already stretched budget to pay for room damage not covered by insurance.  Oh well, such is life.

However, today is not one of those dreary days.  I have to spend a little time helping a dear friend get her brand new house ready for her husband's 60th birthday blowout.  A sneak of some of the projects I've worked on for the house:


Next, a few hours as a shop boy (I know it's a stretch to refer to myself as boy at my age, but shop man just doesn't have the right ring to it) at the gallery on Magazine St. that features my art.

Afterwards, a quick dash back to help with final party arrangements.  Then, a wedding uptown followed by a reception at the Musee' Conti, the fantastic old wax museum in the French Quarter.  I've never been there, but I've heard the renovated reception space is fantastic.  I'm so excited.  And, the Quarter should be hopping tonight....there's a huge Halloween charity event in Armstrong Park, Madonna is in concert in the city tonight, and it's the big Halloween weekend.  This may finally be the night I stay up past 10.


 My outfit for the day.  I don't really have time to change between events, so I needed something versatile and comfortable enough for all day, so I'm going for this pale blue shirt, unlined kakhi jacket (it finally cooled off here, vest, and the only tie left over from my tie wearing days that actually kind of sort of matched.  But honestly, it's all about the vest, because I MADE THAT BITCH MYSELF!!!!!


Recently I decided I needed to improve my sewing skills if I ever wanted to be a great tailor, which I do.  It's been so long (since junior high) since I've sewn, and even thing it was only basic shorts with drawstrings, so I needed to smart small.  Thank God I did.  This vest is about as basic is as it gets, and I still had some major issues.  Let's just say I beg you not to look at the bottom buttonhole.  Still, it turned out good enough that I plan to wear it in public.  I especially like the details, such as the claddagh buttons:

 And the contrast print lining:

Again, I beg you to ignore that nasty, nasty looking bottom buttonhole.


I'm finishing the look with dark, dark dressy jeans and brown boots.  I did double check with the bride and make sure that the outfit would be appropriate.  She assured me it would.  Actually, she said something along the lines of , "I have more important things to worry about than your damn outfit.  As long as you have on pants, I could care less what they're made off."  Asking my partner for his opinion, I received the helpful observation, "You're going to a reception in the French Quarter at a wax museum on Halloween Weekend.  You could go wearing a Little Bo-Peep costume and no one would notice."  

Anyway, off to face the day.

10.26.2012

my beautiful launderette: slow, sure progress


You know, there may actually be something to this slow steady progress thing.  Working on a project an
 hour or two a day, a little at a time.  Usually, I'm more (pardon the expression) of a balls to the wall d-i-yer---jumping in with abandon, often without full preparation.  The kind that rips the room apart, throws the contents into another, plows into painting.....and thus lives with chaos until the project is complete, which, as life gets in the way, drags on and on.  Don't get me wrong...there is something exhilarating about rushing through something from start to finish in a weekend (Trading Spaces was a hit for a reason), but I've learned with this project, going slow can be nice. I've seen steady progress, and as I've only done a little portion of the room as a time, I haven't needed to trash other areas to clean it out---i've been able to deal with the appropriate disposal or organization of the laundry room's contents as I've removed them.

Anway, here's what's happened so far:

I've flanked the window with a second set of wine box shelves, removed the black shelves from the corner (gifted to my partner's twin for his own laundry room), removed the excess trash can, removed the shelf from over the washer and dryer and cleaned floor.

I've also hinged the salvaged doors into a screen, though I've not yet cleaned them or added hooks.  Gross, I know, but I wanted to get them out of my cabanna and in place as quickly as possible.  Since the laundry hasn't gotten it's hard core clean or had any fabric added, I'm okay with bringing in less than pristine items.  I will make sure to scrub them, and the room before I add the curtains and table skirt.


 Remember, at the beginning of the week, this wall looked like this:


Now, it looks like this:
I'm planning to skirt the table (my old sewing table which had been moved into my studio when I updated to the green writing desk) in a drop cloth and add curtains in Waverly's Paddock shawl, a fabric I've loved forever.  In fact, the fabric I'm planning to use was purchased to make a window treatment 7 years ago that i never got around to before moving.  It didn't fit my current home, so I carefully stored it away.  A good thing, because while the pattern is still in production, I'm not sure my color way is.  Here is a pillow from Etsy seller land of pillows in it:
pillow available here
The skirt will look something like this, but with the pleats only at the apex of the curves.  I'm skirting it because a drop cloth is cheaper than a table, and since it rolls, I like to use the table outside for painting.  I can just whip the skirt off for that, and whip it back on to use as a folding table.  with a skirt, i can also roll it outside to use a bar or food table for parties.  I'm toying with banding it in upholstery webbing, but i'm not sure if i want to go to that much trouble for the laundry room.

from Canadian House and Home

10.25.2012

my beautiful launderette: wine box shelves


While I'm been slammed with work and other commitments lately, I'm so excited to finally be moving forward with the laundry room that i just had to get started.  While there are many ways to tackle a project, including the all at once approach, sometimes nibbling away a little at a time is the way to go.  For this makeover, I think that's the approach I'm going to take.

Anyway, in the last post I discussed some of the assets I did already possess for turning this laundry room of doom around.  One of those sets of assets is the possession of a large number of wine boxes, thanks to a partner who used to work in the wine business.  Currently, they weren't really doing me any good.  Hard to reach on the shelves, they had become random catch-alls:


Inspired by pinterest, I mounted a set on the wall to the left of the window.  They fit perfectly between the corner and the window.  I plan to flank the other side of the window with three more, but I have to do some clearing out first.  And, as much as I wanted to blow off some commitments in order to continue, I managed to stay strong, do my little bit, and then go to work.  

I just screwed them directly to the wall, making sure to hit a stud.  None hold a lot of weight, so there is no need for brackets, supports, etc.  I tried them stacked directly on each other, but eventually went for a floating look.  Though the spacing may appear off in pics, rest assured I did measure between shelves and check to make sure they were even and level.  In fact, you can even see the level in some of the pics:


Having shelves up and things neatly put away made a vast improvement.  But even though I like open storage, I had to admit they look neat, but not pretty.  I mean stacks of white dishes are one thing, but who wants to look at bug spray.  Then it hit me, the spray cans were about the same size as some gift canisters I had put away.  My partner's work had them left over after Christmas, and he brought them home for me to use.  They were a little too tall to fit in my pantry, so they had been languishing away on a shelf.  I ran to check, and YES!!!! They were the perfect size for the cans and the shelves.


I immediately ran for more and rounded it up the other canisters and mini-galvanized containers I had.  Immediately the shelves looked so much more polished.


 *Note* I do realize storing things away like this may not be the most convenient.  However, all these things are rarely used.  In fact, I don't even remember the last time I used the bug spray.  Furthermore, it's only a household of two, so I don't have to be concerned with multiple members looking for things.  If you wanted to do a similar thing with more frequently used items, I would suggest labeling them and/or the shelves.

Stoked by the small, but major improvement.  I hung some woven blinds that used to hang in the living room before I switched to cafe curtains.  The wall that used to look like this:
Now looks more like this:
Progress, it's a beautiful thing

10.23.2012

my beautiful launderette: the laundry room of doom

To see my complete inspiration board at pinterest, go here.


 Do you make quick decisions?  Or are you someone who ruminates?  I go back and forth.  Like a lot of designers, I can quickly pinpoint the right choices for clients, but I get bogged down in my own home.  My laundry room has always been a problem room for me.  It has some issues--it's outside, the floor is a concrete slab which gets wet when it rains, the room also must do triple duty as storage, laundry, and powder room.  Add to that mismatched appliances, fragile sheetrock, little light, and a non-existenet budget and you have a recipe for a depressing space.  If I only went in the room to do laundry, that would be bad enough, but since it's the closest source of water and toilet to my studio, I spend a lot of time in and out.  I love my backyard and this black hole has long been a pigeon of discontent.  What makes it worse is that I have always had a love of service spaces (must be my peasant roots).  I love the downstairs at Downton Abbey and Gosford Park, linen closets, well-stocked pantries, butler's pantries, etc.

Anyway, even though I've been thinking about that room literally for years, it was on the back burner until I realized I needed it to look great for our Dec. reception where it will be the primary guest bath.  I didn't want to just slap lipstick on the pig, though.  I wanted to solve it's aesthetic and use issues once and for all.

As I loaded these pictures, I realized that this horror scene is perfect for the Halloween season.  Behold!! The Laundry Room of DOOOOOOOM!!!!!!!!!!!  Readers with a weak stomach may want to quickly scroll past these shocking images:


In any makeover project, one key to success, is accepting and working with your limitations; limitations of time, budget, space, d-i-y talent, architectural and practical limitations, etc.  Fighting against these things will only bring frustration and heartache.  It's like trying to recreate a French Chateau in a mid-century ranch---it just ain't gonna happen.  You can certainly add French touches to add interest and contrast, but without the enfilade room layout, without the 16 foot ceilings, with the 18th century paneling, etc., it's not gonna happen.  At best it will look like what I think of as Disneyland decorating--an obviously fake replica of the real thing; at worst, you'll just be unhappy.  What's the point of that rant?  Thinking about my inspiration pics, I realized I was dreaming about things that cannot be in my laundry room, at least at this point and time.  I can't have custom cabinetry, a counter top and skirt to hide my appliances (we're soon switching the machines to traditional top loaders), a fine floor, built in storage, etc.  And that's fine, but I needed to accept that.

Now that I've had my reality check, what can I do?  In a case like this, I always advise clients (and my self) to focus on what you like and will work instead of what you can't have.  What can I have?  I can have flexibility, a clear conscious from saving money, and a lot of fun, since I'm not planning on serious commitments. 

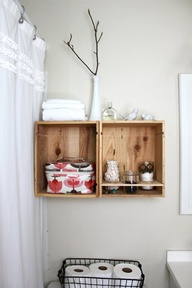
Anyway, last night after working on my to do list, I started looking for inspiration, primarily about how to turn one of my assets:  lots of wine boxes, to use.  Turning to pinterest and searching for wine box shelves, this image popped up:


And, ding, the light bulb went off.  What styles do I love, and have always loved?  Industrial and Boho.  This image clicked all my boxes---instead of trying for tasteful elegance, why not embrace the electic mix I will  by necessity have?  After looking around on line, I realized that the above reminded me of this home office/cottage from the September 2012 issue of Country Living (one of those magazines where I loved every image):

via Country Living


via Country Living
 
I love the color scheme, texture of the walls, and ,even though the furnishings are new, the "found object" feel of the space.  In fact, this photo convinced me to keep the current wall color.  However, I love the black with the pale woods and blue green wall....where to put it?  Then it hit me----on the ceiling!  I can't wait.

I also loved this lake house from the same issue, with a very similar feel:


via Country Living

via Country Living

 Voila:  I now have my direction.  Faux bois walls, using the current wall color as base.  After all I chose the color to help the mismatched washer blend, and while it will leave soon, I don't know when.  I want the overall  palette of the walls to resemble this:


But I'm going to do the faux bois with a much more light hearted approach, ala Richard Woods:

via House Beautiful


I plan on installing the wine box shelves to the left of the windows, but more like this than the inspiration photo  (the window frame will remain in it's distressed, unfinished state:

via pinterest
I was originally planning to paint the sink cabinet to blend with the raw woods, but now I think I need a metallic.  I plan on doing a heavily distressed zinc-like finish based on these Restoration Hardward nightstands:
This photo really has the look I'm going for.  I think I'll rig a similar light for over the sink:

via pinterest
 And to hide the clutter in the corner?  I originally planned to have a carpenter mount a salvaged door I have like this, but further from the wall with a curtain as door:
via pinterest


But since then, my partner found two small doors, so I am planning to add them to make a screen.  This is great, because now I don't have to wait for or pay a carpenter.  I plan to add hooks for hanging clothes to dry.  Plus, it's non permanent, which I love:


via pinterest


I plan to replicate this drying rack, but (since we're a small household only one rod):

Penelope Bianchi via Velvet and Linen


Finishing touches:  A gallery wall behind the machines, mirror over the sink, and black and white touches like  a trompe l'oeil zebra rug painted directly on the concrete floor, new curtains made from tea-stained zebra print fabric (mainly because i have it).

Finally, I'm excited about this room.  Unfortunately, I have a busy week, so I doubt I can make any progress before this weekend, but I'm just so stoked to have a direction.  And one that seems doable.