To see my complete inspiration board at pinterest, go
here.
Do you make quick decisions? Or are you someone who ruminates? I go back and forth. Like a lot of designers, I can quickly pinpoint the right choices for clients, but I get bogged down in my own home. My laundry room has always been a problem room for me. It has some issues--it's outside, the floor is a concrete slab which gets wet when it rains, the room also must do triple duty as storage, laundry, and powder room. Add to that mismatched appliances, fragile sheetrock, little light, and a non-existenet budget and you have a recipe for a depressing space. If I only went in the room to do laundry, that would be bad enough, but since it's the closest source of water and toilet to my studio, I spend a lot of time in and out. I love my backyard and this black hole has long been a pigeon of discontent. What makes it worse is that I have always had a love of service spaces (must be my peasant roots). I love the downstairs at Downton Abbey and Gosford Park, linen closets, well-stocked pantries, butler's pantries, etc.
Anyway, even though I've been thinking about that room literally for years, it was on the back burner until I realized I needed it to look great for our Dec. reception where it will be the primary guest bath. I didn't want to just slap lipstick on the pig, though. I wanted to solve it's aesthetic and use issues once and for all.
As I loaded these pictures, I realized that this horror scene is perfect for the Halloween season. Behold!! The Laundry Room of DOOOOOOOM!!!!!!!!!!! Readers with a weak stomach may want to quickly scroll past these shocking images:


In any makeover project, one key to success, is accepting and working with your limitations; limitations of time, budget, space, d-i-y talent, architectural and practical limitations, etc. Fighting against these things will only bring frustration and heartache. It's like trying to recreate a French Chateau in a mid-century ranch---it just ain't gonna happen. You can certainly add French touches to add interest and contrast, but without the enfilade room layout, without the 16 foot ceilings, with the 18th century paneling, etc., it's not gonna happen. At best it will look like what I think of as Disneyland decorating--an obviously fake replica of the real thing; at worst, you'll just be unhappy. What's the point of that rant? Thinking about my inspiration pics, I realized I was dreaming about things that cannot be in my laundry room, at least at this point and time. I can't have custom cabinetry, a counter top and skirt to hide my appliances (we're soon switching the machines to traditional top loaders), a fine floor, built in storage, etc. And that's fine, but I needed to accept that.
Now that I've had my reality check, what can I do? In a case like this, I always advise clients (and my self) to focus on what you like and will work instead of what you can't have. What can I have? I can have flexibility, a clear conscious from saving money, and a lot of fun, since I'm not planning on serious commitments.
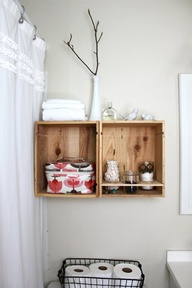
Anyway, last night after working on my to do list, I started looking for inspiration, primarily about how to turn one of my assets: lots of wine boxes, to use. Turning to pinterest and searching for wine box shelves, this image popped up:
And, ding, the light bulb went off. What styles do I love, and have always loved? Industrial and Boho. This image clicked all my boxes---instead of trying for tasteful elegance, why not embrace the electic mix I will by necessity have? After looking around on line, I realized that the above reminded me of this home office/cottage from the September 2012 issue of Country Living (one of those magazines where I loved every image):
 |
| via Country Living | | | | |
|
|
|
 |
via Country Living
I love the color scheme, texture of the walls, and ,even though the furnishings are new, the "found object" feel of the space. In fact, this photo convinced me to keep the current wall color. However, I love the black with the pale woods and blue green wall....where to put it? Then it hit me----on the ceiling! I can't wait.
I also loved this lake house from the same issue, with a very similar feel:
|
|
|
|  |
| via Country Living |
 |
| via Country Living |
Voila: I now have my direction. Faux bois walls, using the current wall color as base. After all I chose the color to help the mismatched washer blend, and while it will leave soon, I don't know when. I want the overall palette of the walls to resemble this:
But I'm going to do the faux bois with a much more light hearted approach, ala Richard Woods:
 |
| via House Beautiful |
|
|
I plan on installing the wine box shelves to the left of the windows, but more like this than the inspiration photo (the window frame will remain in it's distressed, unfinished state:
 |
| via pinterest |
I was originally planning to paint the sink cabinet to blend with the raw woods, but now I think I need a metallic. I plan on doing a heavily distressed zinc-like finish based on these Restoration Hardward nightstands:
This photo really has the look I'm going for. I think I'll rig a similar light for over the sink:
 |
| via pinterest |
And to hide the clutter in the corner? I originally planned to have a carpenter mount a salvaged door I have like this, but further from the wall with a curtain as door:
 |
| via pinterest |
|
|
But since then, my partner found two small doors, so I am planning to add them to make a screen. This is great, because now I don't have to wait for or pay a carpenter. I plan to add hooks for hanging clothes to dry. Plus, it's non permanent, which I love:
 |
| via pinterest |
I plan to replicate this drying rack, but (since we're a small household only one rod):
 |
| Penelope Bianchi via Velvet and Linen |
Finishing touches: A gallery wall behind the machines, mirror over the sink, and black and white touches like a trompe l'oeil zebra rug painted directly on the concrete floor, new curtains made from tea-stained zebra print fabric (mainly because i have it).
Finally, I'm excited about this room. Unfortunately, I have a busy week, so I doubt I can make any progress before this weekend, but I'm just so stoked to have a direction. And one that seems doable.